

Beyond all understanding I have no idea why this image
will not open at the bottom of this post. Humor me and open
this image when you want to see the light set up at the end of
the post.
So, I just returned from Las Vegas. While I was there my baby sister Michelle DiMauro and her business partner Heather Soto celebrated the grand opening of their new studio. They are the owners of Inhabit Design, Las Vegas and they found a fabulous spot downtown in the Arts District. I was there to help celebrate and to take pictures of the party.
While I was there to help set up for the party I have to tell you I was truly excited to see my photography all over the office. Pictures I took of their work were in picture frames, digital slides of the images were passing by in a frame. Their pictures were used in posters and coffee table books. It was really exciting for me to see them get so much use out of the pictures I had taken for them.
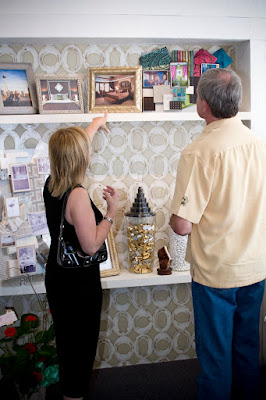
I got a kick out of seeing this party goer pointing to one
of the pictures I took of a room the girls designed.
Anyway, the party was a success and over 200 people showed up to celebrate including the Mayor of Las Vegas. The ladies shined like stars and I can't tell you how proud of them I am.
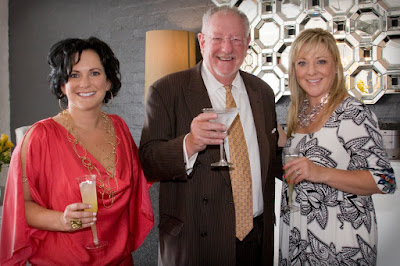
Heather Soto, Mayor Goodman, and Michelle DiMauro
Cheers!
So, seeing all those pictures just served as a reminder that I promised my friend, Noel Hannan (Architect by day, photographer extraordinar by night) that I would show him how I shot one of those interiors I did for the ladies of Inhabit.
While I was putting together this blog and the photos for it I realized I am really terrible at remembering what I did. I always have a PSD file that is not flattened so I can go back and see what I did but sometimes that is limited info. All the while I could hear my printing instructor telling me to keep notes on what I have done in case I ever have to go back and see what I did. Live and learn... again.
So much of what I do I "feel". I look at the light and change it as I see it. I edit the same way. I paint in light and color and shadows as though I'm painting a picture. Shooting architecture interiors are really a breed all their own. It's difficult and it takes time but the beauty of it for me is that I can do it barefoot and in jeans and listen to any music I want. To have a designer with me dressing the rooms is the ultimate dream come true. This particular job that this image belongs to was an eleven hour day for Heather and I. It was 5 rooms with two hallways. She dressed the rooms while I shot the images.
So, enough talking let's go to the image and see what it's all about.
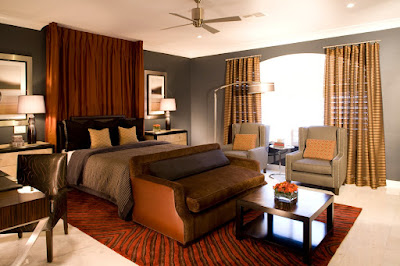
The first thing I do is take an overall shot to see what it looks like. It is really nice having your camera tethered to a laptop so you can see what's really happening like tangency issues, shadows, or uh really bright windows.
So in this I see many dark places in the corners and the side of the sofa has lost all texture due to it's dark color. The frame is too tight at the bottom and the windows are blown out. I really wanted to show case the "headboard" area too.
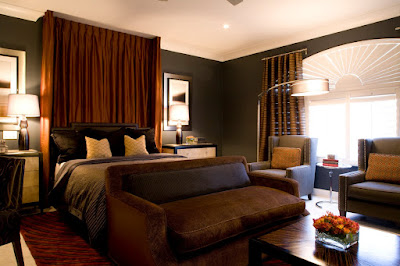
So here we are all lit up
You can also see the strobe in the center of the shot but all my clamp lights
are too small to project enough light so I knew I would have to remove it post. It also caused an insane shadow on the ceiling. I chose to keep it though because I really liked the light on the headboard area. Notice all the light plugs in the walls and vents on the ceiling. I really can't stand those so I plan to remove them in post also. I really focus on capturing the light in camera as much as possible. I also wanted the window to be as dark as possible along with the light on the coffee table. I use mostly tungsten lights for interiors due to the fact that I have to use so many lights. I do prefer to use the new reveal bulbs because they're a bluer light. The tungsten lights explain the bluer light on the coffee table because it was ambient from the window. This is my base image or background image in photoshop.
This is my second image that I placed on top of the first image as a layer. I then, through a mask, removed the entire layer and slowly replaced the ceiling and area of the strobe head with a reverse brush.

This is the final image. I kept the base image and only replaced the ceiling from the top image. I have a curves layer of blue brought down and masked to add more warmth to only the coffee table. Then I added a curves layer of blue brought up to "clean up" the light from the yellow tungsten hue. I think the color is cleaner and more elegant.
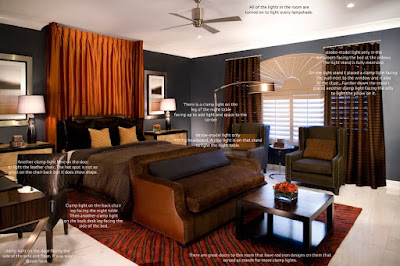
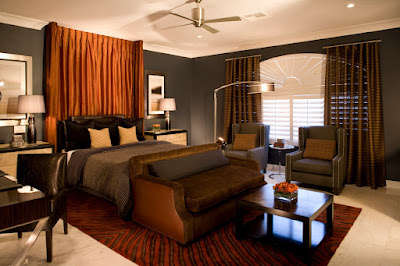
Here is my final image with light placement. Click on the image to see a larger view of the room and text.
I used a total of 16 lights in this room which includes all the room lights.
Being that 16 lights can get really expensive I have invested in many clamp lights from Home Depot and I fill them with reveal bulbs. When they break I just throw them away with not even a single tear because they cost $5.00 to $7.00 each. My key lights are my JTL strobes set to the model light mode only.
Clearly, I am not a tutorial kind of girl and SO not an expert in any way but you asked and I hope it was insightful. Its what works for me.

Hi Kelley,
ReplyDeleteJust dropped by to say what a great job you did with the interior shots. The final image is superb; very well composed, bright and very clean...really nice job and good job too on the 'walk through'.
Thanks for sharing,
All the best to you,
Glyn
Thanks so much Glyn! I'm so much better at sitting one on one and leading someone through the process. I'm always worried I am not making sense.
ReplyDeleteSo nice to hear from you!
Kelley
Kelley,
ReplyDeleteIt all makes perfect sense and the results are spot on!
Best wishes to you,
Glyn :)
TY! ;-) Sweeet.
ReplyDeleteHi Kelley,
ReplyDeleteHope you keeping well - certainly know you've been keeping busy from your tweets!
Thanks for the insight & walkthrough into interior photography. Not something I've had to dabble in so far, but I know it's a difficult subject matter given the white balance issues with mixed lighting and knowing where to place lights.
I think you've crafted a great final image and as Glyn's said your narrative makes perfect sense. Hey who knows you might move onto video tutorials after a few more of these written walkthroughs ;-)
Kind regards,
David
David,
ReplyDeleteThanks for stopping by. I would love to do the videos but I'm a bit challenged in that area. I received a flip for Mother's day so I will be learning how to use it if I can get it from my kids. I worry that I may be too much of a loose canon in photoshop to be of any real use. So much of what I do came about as survival modes and turned into workflow LOL. I'm also a bit of a fast talker, probably not too hard to believe.
Again, thanks. I've missed talking with you guys.
All the best, Kelley